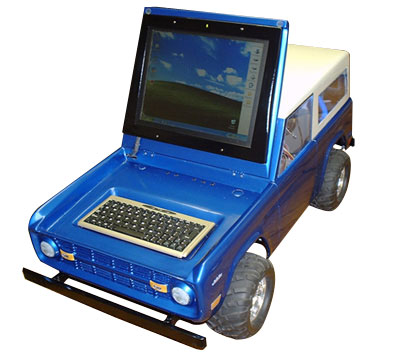
I started with the idea of an mp3 player for my
garage because all my CD's were getting scratched and dirty. At
the time (Jan. 2004) I was planning an upgrade to my gaming computer
and figured I would have extra parts left over. So I tried thinking
of something that would ''fit in'' in a garage setting. Since I
had recently finished working on my '69 Ford Bronco, I decided that
would make a cool looking computer case and began taking measurements
of the Bronco and major computer parts to find a scale that would
work well. I found that 1/5th scale worked great. I also wanted
it to be self contained and compact as possible and still use desktop
components.
So I started making a model out of clay and spent about 3 months
getting it right. I found a 12.1'' LCD screen on EBay for $100 that
was just the right size for under the hood. After the clay was done
and all measurements checked out I made a rubber mold. I then formed
the computer case in the rubber mold with fiberglass, which I had
only worked with a little bit on car body repairs. This was a lot
different and took some experimenting to get the hang of it. Luckily
it did come out of the mold fairly good on the first try. After
getting the fiberglass case out of the mold, I used bondo to fill
all the little air holes followed by lots and lots of sanding.
I cut the hood off so I could fit the LCD screen, a recessed control
panel for the keyboard; power, reset and LCD control buttons which
fits under the hood. The LCD control boards had to be relocated
because I wanted the hood as thin as possible, so they ended up
on the inside of the roof which meant having to lengthen all 52
of the wires by 6’’. I also added 2 USB plugins in the
center of the front turn signals for easy use of my 1GB PQI Intelligent
Stick thumbdrive that also came from Newegg.
Next came the steel frame, bumpers (which doubles as carrying handles)
and floor. I used an old motherboard, CDROM, hard disk drive and
power supply to find the best configuration and make all the mounts.
I found a set of RC truck tires on EBay for $35 and got them mounted
with steel legs against the inside of each one to hold the weight
and so it wouldn’t roll.
It was now about November ’04 and time to upgrade, I bought
everything from Newegg.
MSI K8N NEO2 Platinum Mobo #N82E16813130468
AMD 64 3400+ Proc #N82E16819103503
512MB Kingston DDR400 Ram #N82E16820141424
VGA Prolink Geforce 6800 Video Card #N82E16814108138
160GB Samsung 7200 rpm HDD #N82E16822152011
Kingwin K8CU-8025 CPU Fan #N82E16835124004
NEC ND-3500A DVD-RW #N82E16827152032
Some of the old parts that went into “The Bronco”
were also bought from Newegg a long time ago by a friend and co-worker
that sold me my first computer. They are….
Shuttle Spacewalker KT266A Socket A Mobo
AMD Athlon 1700+ Proc
OCZ PC2400 DDR Ram 256MB x2
Geforce 4 Ti4200 Video card
Sound Blaster Live! PCI sound card
USB 2.0 PCI add on card
Antec 350w PSU
Other parts include…
Linksys 10/100 PCI network card
2 Blue ccfl tube lights
PSK mini USB keyboard
Logitech wireless mouse
As you can tell there are a lot of PCI cards, but they all fit
in the case really well.
Now it’s time to paint. I used the color - Intense Pearl
Blue- which is the same color as the “full size Bronco”.
I put on 4 coats plus 4 coats of clear.
The windows were milled down on the edges to fit flush on the
outside of the case and glued in with clear silicone.
The decals are pictures of the actual Bronco emblems cropped and
resized in Photoshop & printed on Testor Water Soluble (slide)
decaling film, I applied and clear coated over them so they won’t
come off.
I decided I wanted a faster optical drive than the old Plextor
16x CD-RW so I went back to Newegg and got another NEC ND-3520A
DVD_RW to replace it, I also needed a new HDD and got a Western
Digital 80GB 7200RPM WD800JB to hold all the music.
I put a lot of time into planning the project which worked out
great because the assembly went smoothly and it fired up the 1st
time with no problems installing Windows XP Pro.
The LCD screen used an AC-DC adapter so I eliminated it and connected
it direct to the main PSU so there’s only one power cord.
I got an 1/8th inch mini stereo plug to 2 RCA plugs for hooking
up to any house stereo and an FM modulator to send the audio to
any radio within 1000 feet.
It took about 14 months total but that’s only 1/3 of the
time I spent on the “full size Bronco” rebuilding it.
I now have my router hooked up and the two computers are linked
between the house and garage with broadband internet access on both.
Now I have 2 Bronco’s that I really love and a great gaming
machine in the house. I have learned a lot about what it takes to
build something like this from scratch, I had never done any work
with modeling clay, very little with fiberglass and no experience
in computer design, but I like what I ended up with.
Now I have an eye catching PC that works great as a mobile juke
box. With the integrated Keyboard, LCD screen, and wireless mouse
I can go to any party to surf the net or play some tunes. I don’t
need to add any speakers because with the use of the FM modulator
I can just hook up to any one’s stereo system and be jamming
in 2 minutes…
|

